


If you have ever visited WP Mayor Jobs Page, you will find WordPress related jobs from various sources like WordPress.net, WP Hired, Smashing Magazine, and Upwork.
Ever wondered how to create such a job listing page?
The answer is simple – using the WP RSS Aggregator plugin.
You can also develop such a page on your website. In this article I will guide you to creating a job listing page using the WP RSS Aggregator plugin.
WP RSS Aggregator
If you follow WP Mayor you must have heard about WP RSS Aggregator. For those who haven’t, let me introduce it to you.

WP RSS Aggregator is the best RSS feed importer WordPress plugin. With the help of this plugin you can easily create an aggregator site.
There are many ways by which you can use this excellent plugin:
- Create news aggregator site like AllTop
- Show your freelance writing portfolio
- Import Instagram pictures to your WordPress site
- Create a Job Listing Page
- Show articles from fellow bloggers on your blog
In short, the possibilities are endless.
Step by Step Guide to Create a Job Listing Page
Let us create a Job Listing Page similar to the WP Mayor Jobs Page.
We will create a jobs page for freelance content writers that will fetch writing jobs from ProBlogger Job Board and WordPress.net.
Step 1: Install the Plugin
First of all, install the WP RSS Aggregator plugin on your site. The basic plugin is free and is available in the WordPress Plugin Repository. You can also use the premium add-ons available for this plugin to enhance the functionality of your site.
To install the plugin, you may follow one of the following ways:
- Download WP RSS Aggregator from WordPress.org and upload it to your WordPress site.
- Go to Plugins – > Add New – > Search for “WP RSS Aggregator” and install it.
Once you have installed it, activate the plugin and you will find RSS Aggregator in the menu on the left sidebar of your WordPress admin panel.
Step 2: Get Feed URL
This is the most important step. We need the feed URL of the source to import the desired content using the plugin.
In our case, we need feed URLs of ProBlogger Job Board and WordPress Jobs Page.
ProBlogger Job Board
You will find the feed URL of the page and the category pages in the sidebar:

Right click on the feed icon and click on copy link address. If you are targeting any particular category you just need to use the feed of that category.
Here is the feed URL of the ProBlogger Job Board – http://feeds.feedburner.com/ProBloggerJobs
WordPress.net
Go to WordPress Jobs Page and you will find the feed icon for the Writing category. Again, right click on that icon and copy the link address.

Here is the feed URL of the Writing category of WordPress.net Jobs Page – http://jobs.wordpress.net/job_category/writing/feed/
Step 3: Add Feed URL to WP RSS Aggregator
It’s time to add the feed URLs.
Go to your WordPress admin panel and click on the Add New option present in the RSS Aggregator menu. This will open a new page to add the feed source.
Let me explain the options present on this page:

Name of the source – You can give any name of your choice for the feed source. Let us name it ProBlogger Job Board.
Feed Source Details:
- URL – Enter the feed URL in this text box (e.g. –
- Limit – You can restrict the number of results using this option. Say, if you limit it to 10, only 10 of the latest jobs will be fetched from the page and stored at one time. Don’t change it if you want to fetch all the results.
- Link to enclosure – Tick this box to make feed items link to the URL in the enclosure tags.
- Unique titles only – Check this box if you don’t want to allow multiple feed items with the same title.
Feed Preview:
It shows a preview of the feed items fetched by the plugin from the desired source.
Force the feed – Sometimes you might get an Invalid feed URL error in the feed preview, even if the feed URL is correct. In that case, checking this option might be able to fetch the results.
Feed Processing:
- Feed State – If you keep the feed state as Active, it will continue to fetch the results from the source. However, if paused, it will not fetch any new results.
- Active feed – If you have paused the feed state, you can set a time to make it active again.
- Pause feed – Use this option to pause the feed state at your specified time.
- Update Interval – It is used to determine how frequently the feed source should check for new items and fetch new results if any.
- Delete Old Feed Items – If you set this option to 30 days, it will delete the items which are older than 30 days.
Once you are done, click on Publish Feed. This will fetch all the results from that particular feed URL.
Similarly, add the feed URL of the Writing category of the WordPress Jobs page.
Step 4: Create the Job Listing Page
It’s time to get our hands dirty on creating our job listing page.
First of all, create a new page. Let us name it – Freelance Writing Job Board.
![]()
Now, click on the WP RSS Aggregator icon present in the editor, and the following pop-up window will open up:

- Feed Source – Check All feed sources if you want to display the results of all the feed sources. If you uncheck it, you will have the option to select the feed sources of your choice.
- Exclude – Select any feed source which you don’t want to show.
- Feed Limit – You may restrict the number of results using this option.
Since we will show all the results in our Freelance Writing Job Board we can tick the All feed sources option and click on the Add shortcode button. This will add the RSS aggregator shortcode on your page.
That’s it. Let us publish the page and view it in our web browser:
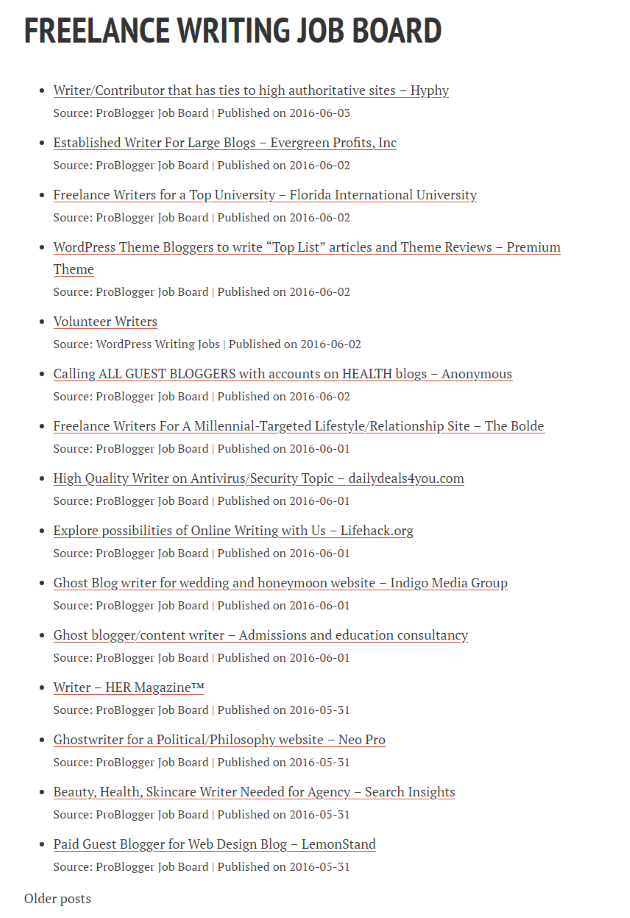
Isn’t that simple?
The above page shows all the results of both the feed sources. Each item shows the title of the job, source name and the date on which it was published.
You can limit the number of results on the page from the Settings page of the plugin. Just navigate to RSS Aggregator -> Settings and you will find an option called Feed display limit. Let us set it to 15. If the number of results is more than 15, pagination will be added automatically and it will help you to navigate to earlier results.
Conclusion
With the help of WP RSS Aggregator it is very easy to create a job listing page on your website. The most important thing is you do not have to be a programmer or an expert to create such a page. A basic understanding of WordPress is all that you need.
Have you created a jobs page or any other page using this plugin? Share your story with us.
